Yet another method to reduce noise with two exposures.
There's a technique to achieve larger dynamic range and minimize noise in the shadows in a scene that consists on taking two exposures of the same scene with tripod. One of the shots must be correctly exposed (no highlights burned) and the second overexposed around 3 stops (the overexposure is achieved by reducing the shutter speed - keeping the same aperture/f number).
That overexposed second image will have its highlights burned but the darker zones contain noise-free information. This image is then exposure corrected in the RAW program decreasing the exposure level control exactly the same number of stops it was overexposed (against the base image). The resulting picture has hopeless highlights but everything below a certain threshold contains crisp clean data.
Then it's a matter of merging both images overlaying on top of the well-exposed shot only the useable information of the second one.
Down to here the theory, what follows is a way to perform it among many other systems. This particular technique has two important advantages that are described later, in Part II.
We need any RAW processor (having the option to correct the exposure, this is common in all these programs) and PhotoShop (or any image processing program working in 16 bits or more able to stack two layers with an opacity mask).
First a quick resume of what we will do and a detailed description follows:
We will place both images as layers in PS. In the bottom layer goes the well-exposed shot and on top the overexposed-corrected shot with a layer mask being the "overexposed (not corrected) shot inverted" (if this makes no sense go ahead, if it does and you know how to do it, try with a pair of images of yours and skip to part II as what follows just describes how to do it)
Now step by step instructions (they are easier to do than to read :-)
Part I Essentials
1 Shooting
We need a stable tripod and a contrasty scene. Set in your camera the lower ISO (native ISO, not the additional digitally faked that some cameras have). Set to shoot RAW. Measure so there will be no highlights clipped. Shoot. That's the image we would get normally and will lead us though the process.
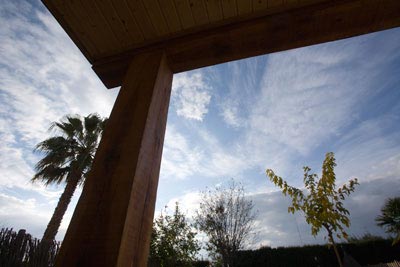
IMAGE A 1/320s f10 ISO100 |
Decrease the shutter speed three stops (the exact number will depend on the scene your experience and your RAW processor in this sample was 3 stops. Shoot. You got an way too overexposed image, that's what we want. We get something like this:
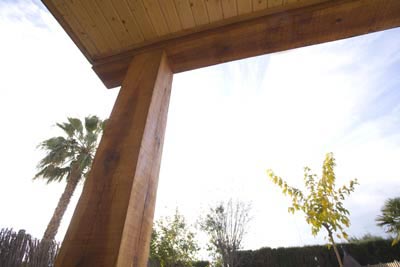
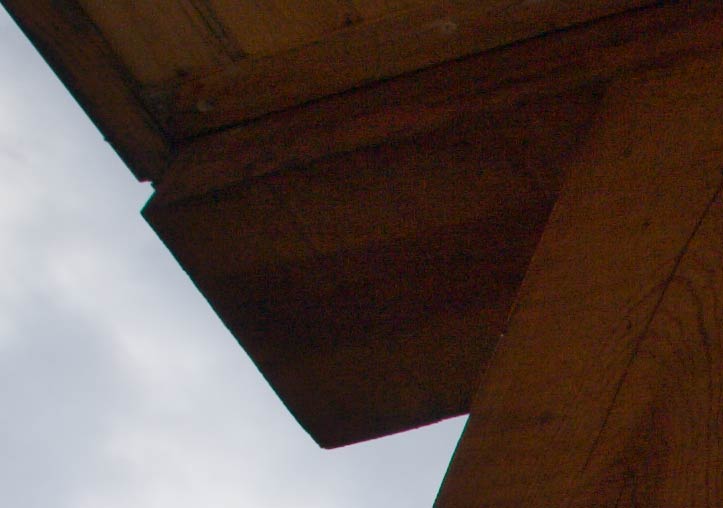
IMAGE C 1/40s f10 ISO100 |
2 RAW processing
Set your RAW program to generate TIFF files of 16 bits. (If you use Adobe Camera Raw that's the default and the images will be loaded directly so skip instructions about loading)
We have to process the first shot (well-exposed) at taste (the first times try with no adjustments). The second shot, the over-exposed must be processed with the exact same settings as the previous one AND with the exposure corrected way down as many steps as we overexposed it, in our case -3. This is the overexposed+ corrected, quite a disaster in the highlights (but with so smooth shadows!)
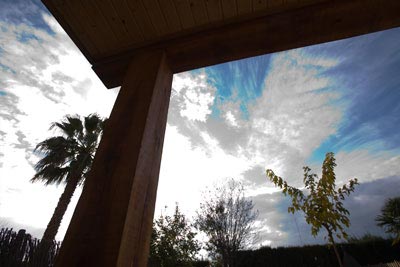
IMAGE B 1/40s f10 ISO100 - RAW processing -3 EVs |
Do one more RAW processing of this overexposed pic but with no exposure correction (the highlights will be broadly clipped, see IMAGE C above)
3 Image processing
Now go to PhotoShop (or any software able to stack layers with opacity masks working in 16bit mode).
In the following descriptions what we need to do in generic terms is in this white color followed by a step by step description in this color. Keyboard shortcuts are for the PC version of PhotoShop. If you are on a Mac where it says Control read Command and where it says Alt, Option.
- Load the first image, the correctly exposed (IMAGE A)
- On top, as a layer, place the overexposed-corrected IMAGE B: Load
the image file, Select all (Control+A), Copy (Control+C) and close the file if
you wish. Go to the working image and Paste (Control+V).
Name this layer cleaner.
- Now the crux: Set a layer mask being the IMAGE C (the overexposed not
corrected) AND Invert it. Easier to do than to tell.
Step by step (we
have alreay IMAGE A loaded)
a) Load the overexposed image with all the highlights clipped and copy to Clipboard (as before Select All + Copy). Optionally close that file.
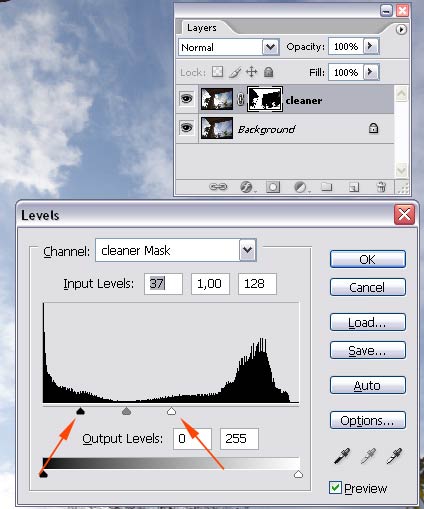
b) Go back IMAGE A and create a new layer mask (click the icon A in figure 1 below).
c) Activate that layer mask: Hold down the Alt key and click in the mask's icon (in the layers palette B in figure 1 below). You should see the image going all white (you are seeing the mask itself)
d) Press Control+V, this will paste the image we copied in the previous step a) to the layer mask. Now you should see the highlights- clipped image in back&white.
e) Invert it by pressing Control+I, now you see the image inverted like negative film.
f) The mask is ready. Visualize the image by clicking on the colored image icon at the left of the mask in the layers palette)
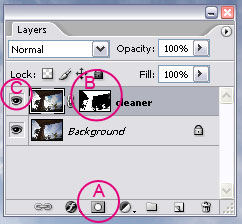 Figure 1 |
We are all set!
4 Checking
To see well what you achieved place a new curve adjustment layer on top to boost the shades so you can see the details (exaggerate this a bit so you can analyze the noise there)
Set the image at a 100 or 200% magnification and look the darker zones,
look nice right? (alt least they look clean) 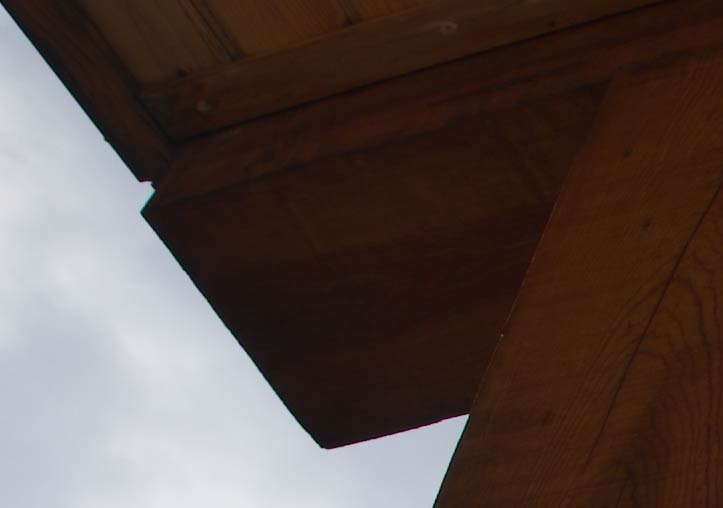
(No sharpening has been applied yet)
Now disable the "cleaner" layer (click it's eye icon in the layers
palette C
in
figure 1), now you are seeing the same image but with no noise correction.
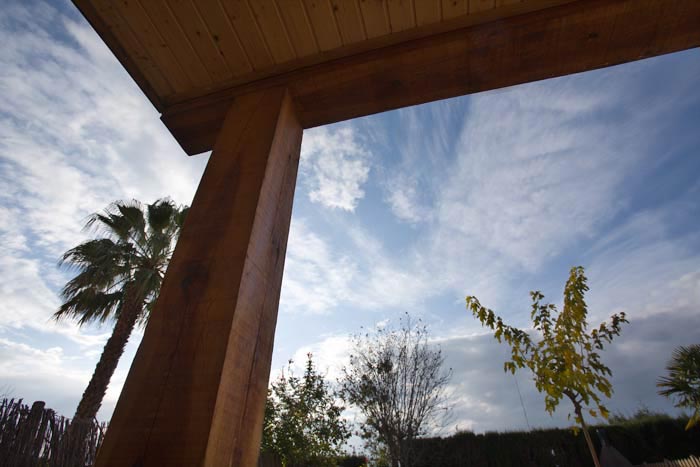
And this the result after some additional processing to boost the shadows
Click here
to see another
sample, more extreme  .
.
With that layer mask we have a lot of control of the process. Before exploring the additional possibilities it offers, if this is the first time you hear about this, I suggest you to experiment and familiarize with it so the following explanations will be more meaningful.
Part II Riding the beast.
* Progressive blending and its thresholds.
The layer mask guarantees that what is pure black on it correspond to zones in the overexposed image that do not contain useful information. (What's black in the mask is what was white in our overexposed shot and this is the data we want to discard from the top layer).
From this black level there's a gradation of grays until zones that may have pure white making the blending of the two layers progressive. But you can control this "progresiveness" by simply applying levels to the mask: Moving the black slider to the right we force it to filter out further zones of highlights that probably have some of the channels clipped.
In this same levels adjustment moving the white point to the left will make the darker gray zones in our image to come completely from the top layer, the one containing the most important information (except -of course- the lost highlights) . Move it to the left generously, going to the middle of the histogram is not bad idea.
|
So, by applying levels to the blending mask we are setting the thresholds values where that progresiveness starts and ends.
* Manual antighosting.
A common problem shooting twice is that though you have everything steady something moves in the scene. The most common example would be some branches or leaves against the sky and a breeze. When doing the blend you will find double images, "ghosts" that happen because in these regions of the image the mask allows both to pass thru.
The solution to this is painting with a brush on the mask:
Painting black in the opacity mask of the cleaner layer will mask out the data of the upper layer leaving only information of the lower one, the exposed correctly (but prone to noise). It's the best bet when you are cleaning branches against the sky (but be careful to avoid noise if possible)
On the contrary, painting white will let go thru the data of the top layer. This is useful in zones in the image that do not contain anything too bright (or we would be recovering zones actually burned from the overexposed capture). For example this would work on a baby crawling on a not too bright floor.
And one more advantage that I hope you will find is that it is fun :-)
Part III References & Acknowledgements.
(incomplete)
Guillermo Luijk is developing software exploring the same technique in his case with multiple, two or more, exposures and doing the process directly in the RAW processor! that will produce even more powerful digital data. And he has some very handy free utilities and insightful tutorials. (Web site partially in Spanish)
� Juan Trujillo Tarradas.
All Rights Reserved.
December 2007
Vilassar de Dalt, Barcelona. Spain.
_______________________________________________
home
articles
photos